

![]()
I’ve recently started studying again and taking my time doing so. I think it wasn’t a bad idea to separate each module by 2 weeks for me. It allows me to pay around and build stuff in Azure while I reference the Microsoft documentation.
I have finished my first item:

which covers Azure accounts, subscriptions, management groups, and resource groups. It also covered items such as Azure datacenters and the strategy behind its locations in what Microsoft calls Azure Regions, and Region Pairs and within each region, Availability Zones.
Now I have gone to the next section:

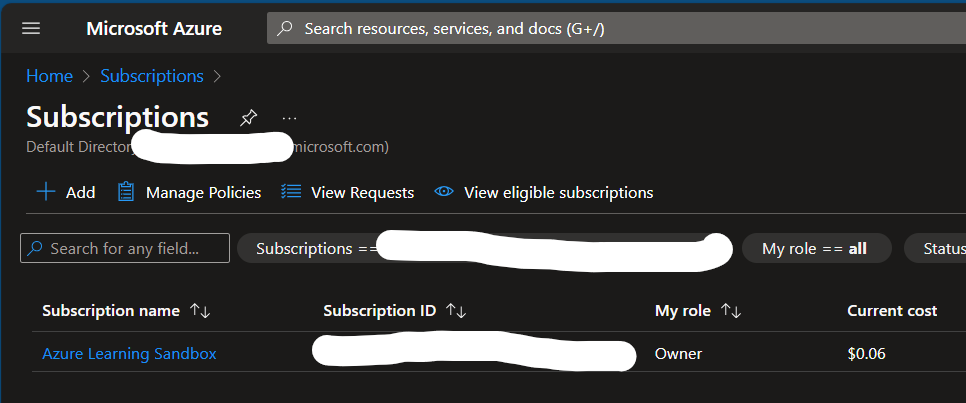
And for this I actually did something a bit more different than what I usually do. I created a separate subscription dedicated to Azure Learning. And that’s actually what I called it. Azure Learning Sandbox. I’ve decided I will separate my resources by its parent definition. So, for example, if I created a VM, it would live in a resource group called ‘Compute’. If I created a VNET, then it would live in a resource group called ‘Network’. You get the idea.
This is my subscription:
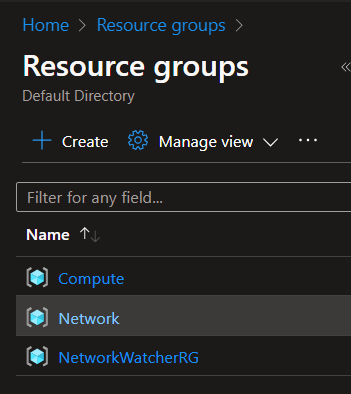
And these are my resource groups so far:
For my base network I setup a VNET with a Network ID of 10.0.0.0 and \25 which should give me more than enough IPs and it should allow me to further subnet it to a \26, \27. or \28’s if I wanted to. So, I did.
I have dedicated subnets for my Azure Virtual Machines, Azure Virtual Machine Scale Sets, and Azure Virtual Desktop instance. I’ll probably create more subnets as I go for different resources.
After I setup my simple network, I began going through the documentation (https://learn.microsoft.com/en-us/training/modules/describe-azure-compute-networking-services/). I didn’t create a VM simply because at this point this is something I already know how to do well, and I have too many VM’s already for other stuff. But next up are Virtual Machine Scale Sets. I went through the documentation and began setting up my first VM Scale Set (VMSS). I’ve never used scale sets before, but the concept is interesting. Essentially, I can create 1 image and scale up and down as needed with load balancing. I can configure and manage multiple VM’s as a group instead of individually. For my scale set, I chose an Ubuntu image and used a dedicated subnet for that and because I didn’t want to incur more costs, I chose not to have any instances, but I did want to go through the process of actually setting it up.
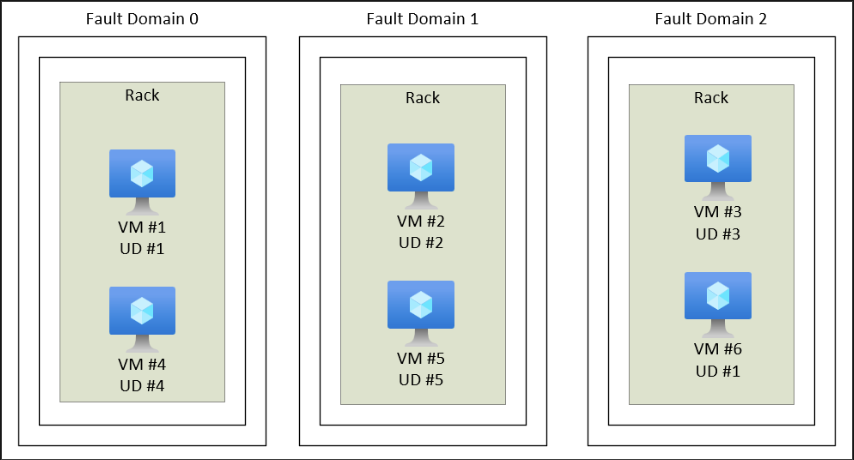
Next was to learn more about availability sets and their 2 options for those being: classic and managed. First, let’s see how Microsoft defines availability sets: “Availability sets are designed to ensure that VMs stagger updates and have varied power and network connectivity, preventing you from losing all your VMs with a single network or power failure.” How is this implemented? They group virtual machines into 2 different groups. A group called an Update Domain, and a group called a Fault Domain. An Update Domain is a group of VM’s that are set apart for a time, for updates, reboots, and other maintenance items. While those machines are getting updated and whatnot, there is the other group – a Fault Domain – which groups your other virtual machines by a common power source, and network switch except in addition to that, they actually split your VM’s across 3 fault domains by default, meaning different power sources, and different networking resources. So, if one area is down, at least you have 2 other areas that are fine ensuring there are no disruptions or so that’s the theory.
So, what’s the difference between a classic and a managed availability set?
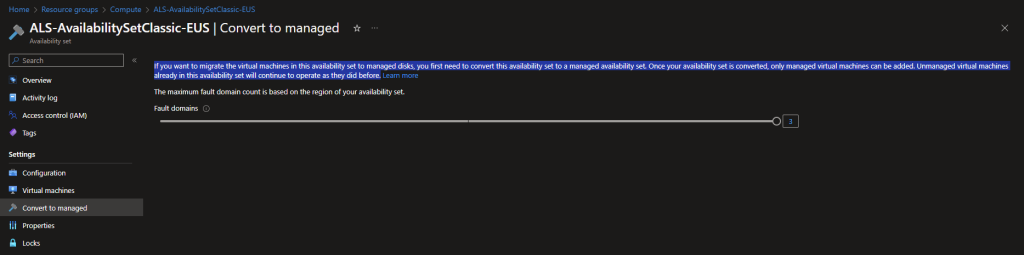
Classic availability sets are for VM’s where their disks are not managed. Managed Availability Sets are for VMs where their disks are managed. I had trouble trying to find information on this but when playing around with availability sets in the portal, Microsoft actually gives us that information. See the below screenshot of a classic availability set:
Next on the chopping block was Azure Virtual Desktop. After reading a lot into this, I observed that there is quite a bit of configuration needed for this. In fact, for my case, a bit too much. Honestly, I skipped this part. Maybe in the future if I want to be specialized in AVD, I’ll come back to this feature. For now, I’m ok knowing what AVD is and its offerings.
Moving forward we are now introduced to containers! Instead of managing a virtual machine that contains a guest OS, then slapping some software on top and its dependencies to run your application + ensuring the VM gets security updates and hoping those updates don’t break stuff, you can use containers. Containers being another form of a virtualization environment. Similar to how VM’s live on a host machine, containers too can live on a host, but containers don’t have an OS to manage. It’s just a platform to run your app on. Containers are light weight, incredibly agile, scalable, they can individually restart if it crashes. It’s great for running microservices for your application. Now, to be fair, I am not a developer, and I’ve never seen it live in a production setting, but the theory of it is quite interesting and I can see the benefits of using this technique.
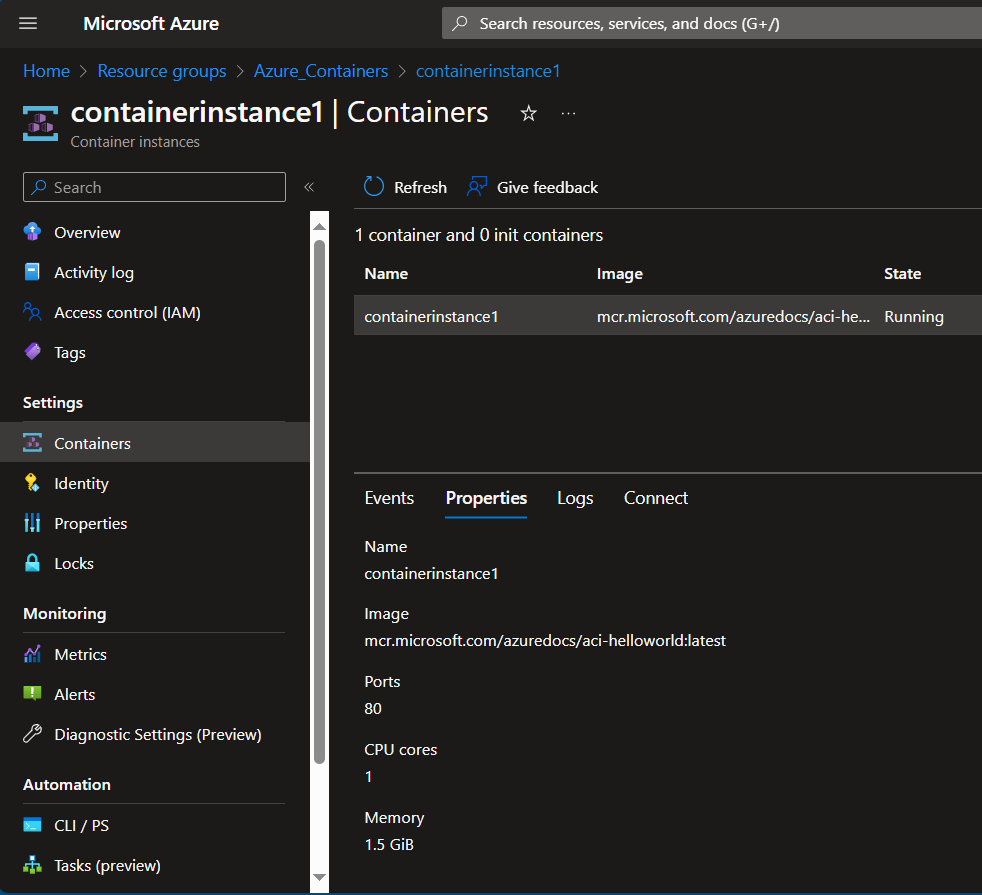
Azure actually provides several PaaS (Platform as a Service) offerings for containerization technology. Azure has Azure Container Instances: which allows you to upload your current container or get one from a registry and then have the service run that container for you. Microsoft docs says it’s quick and easy and when I deployed it, it pretty much was. I imported an image from Azure’s registry and had it running in a few seconds.
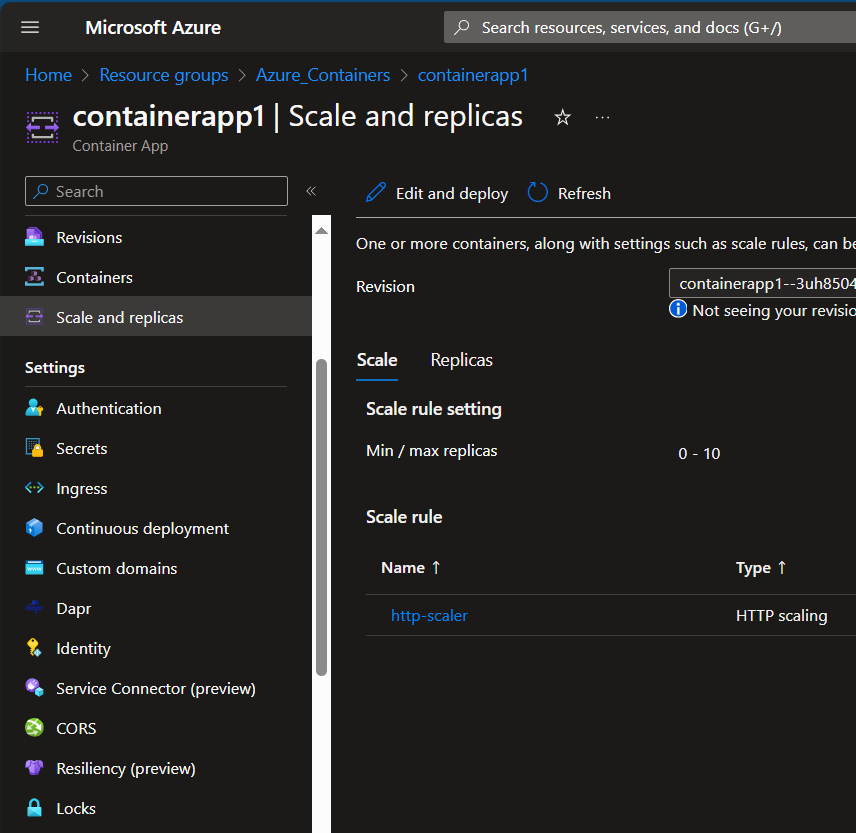
What if you have multiple containers you want to upload and manage from one page and include load balancing and scaling? Azure Container Apps might be the solution for that as it has more configuration options for your app.
And maybe not finally, but at least based on the Microsoft Docs, there is also Azure Kubernetes Services. A platform that allows you to manage the deployment of containers, manage scaling, updates, networking configs and storage config’s as well. I actually began to have an idea for a small project to use containers and maybe AKS after watching this video:
https://www.youtube.com/watch?v=c4nTKMU6fBU.
The plan is simple. Create an app or maybe a script that checks in with my YouTube channel every 1 minute and tell me if there is anything new – whether it’s a new like, 1 more view on a particular video, a comment, etc. Maybe…even integrate it with Twilio and have it sent me a text message if there is something new. Anyways, have that run in a container on a separate VNET in Azure. Then associate that with AKS and see what else I can do with it there. As I am writing this, it is not done yet, so it is still a plan but if I do it, I’ll write about it here as well and update this article.
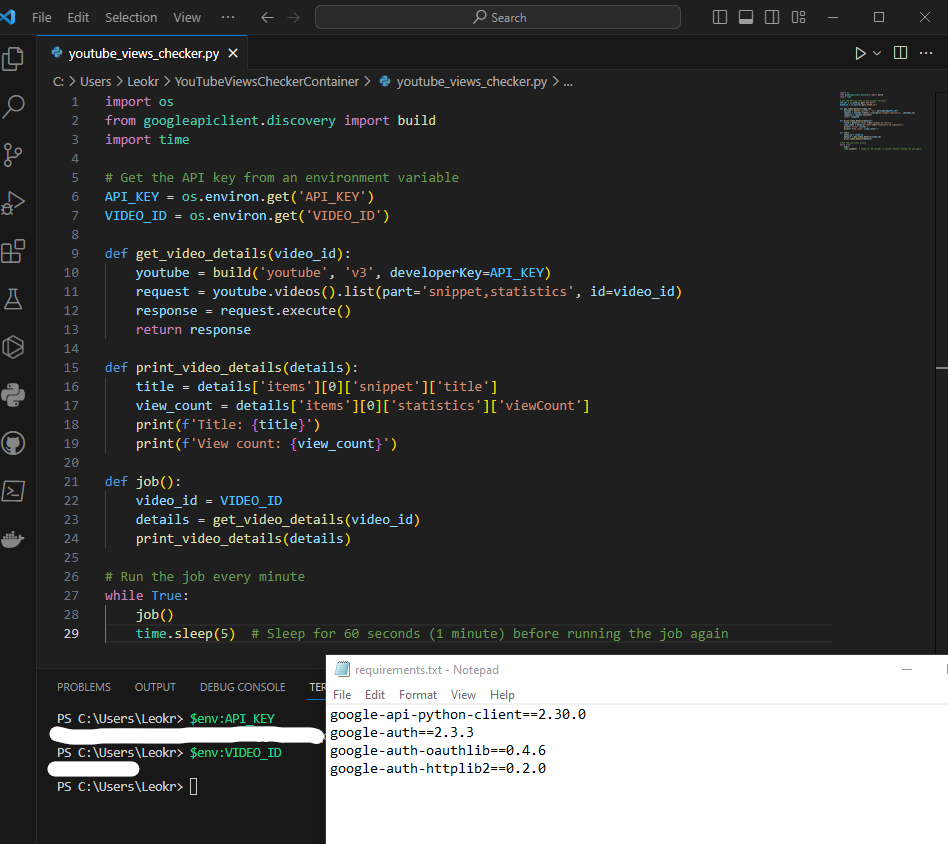
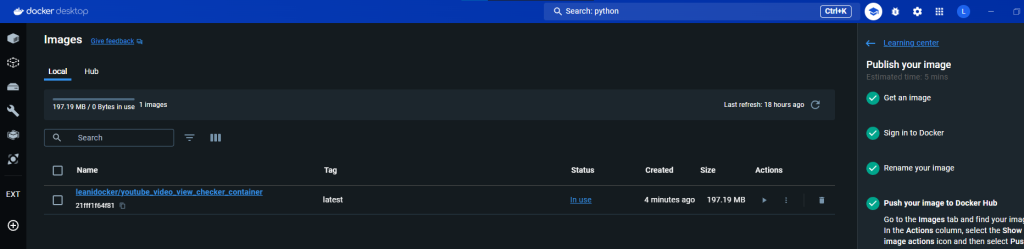
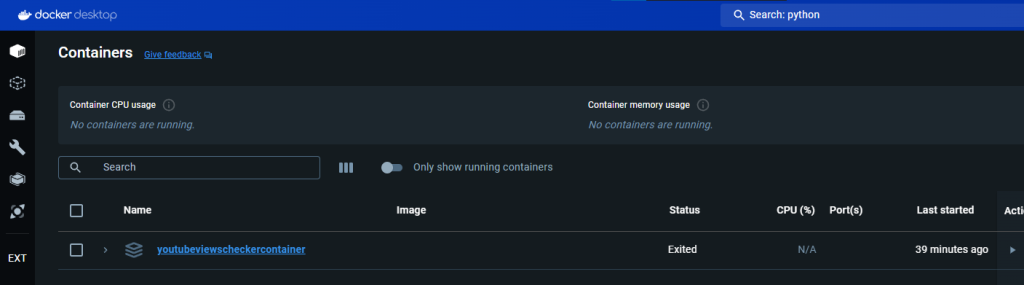
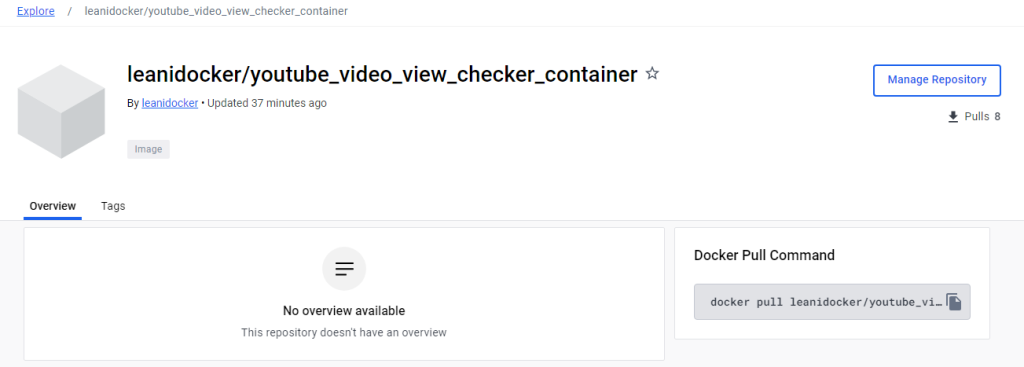
UPDATE: I ended up creating a simple python script that queries a specific video on my YouTube channel. It pulls the title and how many views it currently has and checks every 5 seconds. I then began reading Docker documentation to learn how to containerize this script. I LEARNED A TON. I installed Docker for desktop on my computer, went through the tutorials and did the whole welcome-to-docker container lesson thing. With the help of OpenAI ChatGPT, I was able to successfully create my own image, push it to Docker Hub, and then from there, pull it into an Azure Container Instance. However, I noticed it worked right off the bat, and that was a problem. A security problem…
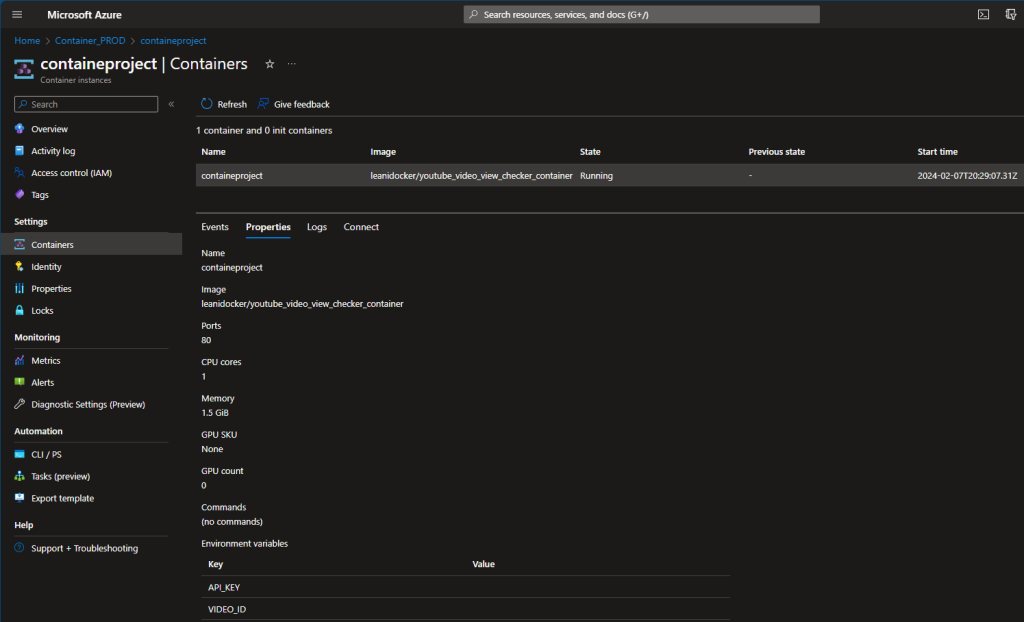
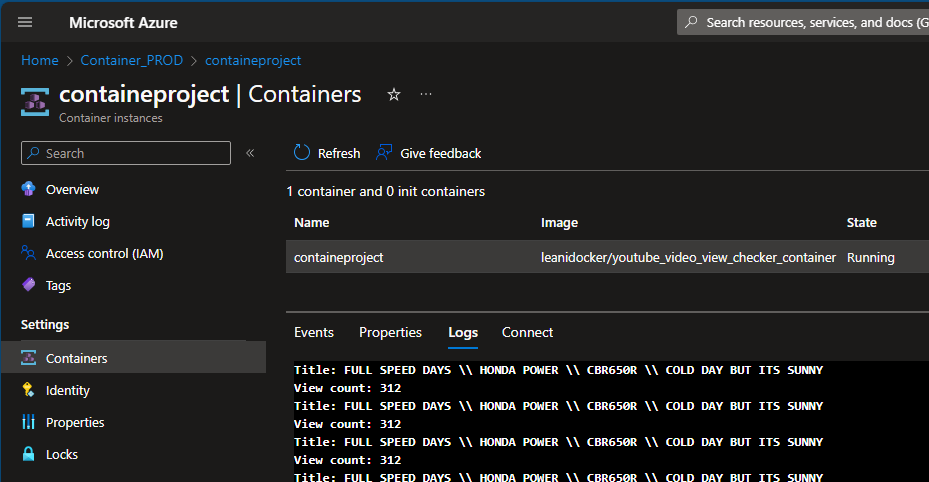
My image, that I published to a public Docker Repository, had my video ID and … my API key hardcoded into it. I immediately changed my repository to private, stopped my container on Azure, revoked and deleted my API key and created a new one. By the time I noticed this, it was 12:30 AM on a Tuesday night. The next day however, I was able to modify my script to use environment variables which I could define when importing my image. The script no longer had the key hardcoded into it. I then recreated my image, changed the name and tagged it, then pushed it to Docker Hub. Afterwards, I deleted my previous container instance in Azure, created a new one, pulled my image, defined my environment variables and voila, had it running successfully! I learned how to create a Docker File, a requirements.txt file, learned how to use commands like ‘docker init’, ‘docker compose up –build’ and ‘docker tag’. I learned how to secure my script better using environment variables. I learned how to publish, push and pull a Docker Image into Azure, and learned how to deploy a container on Azure. Below are some of the pics of my work:
Ok.
Moving forward, I wanted to learn more about how to deploy an Azure Function. Theory wise, it made sense to me, but in the past when I would play with it, I didn’t understand it as much as I thought. That’s where ChatGPT came to help. I honestly didn’t know how I could learn about Azure Function without a lab exercise, so I asked ChatGPT the following: “help me learn and understand how an azure function works. provide a simple lab exercise I can do in my azure tenant.”
It gave me a lab based on JavaScript, but I don’t understand JavaScript, nor do I want to learn about it. I do know PowerShell and it turns out that PowerShell is a runtime available to use, so I asked ChatGPT to give me a PowerShell example. It gave me the following instructions:
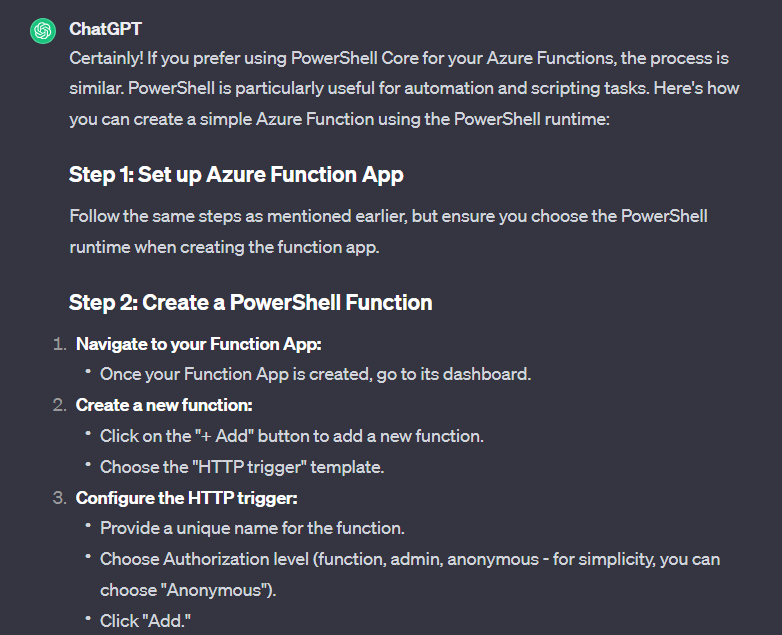
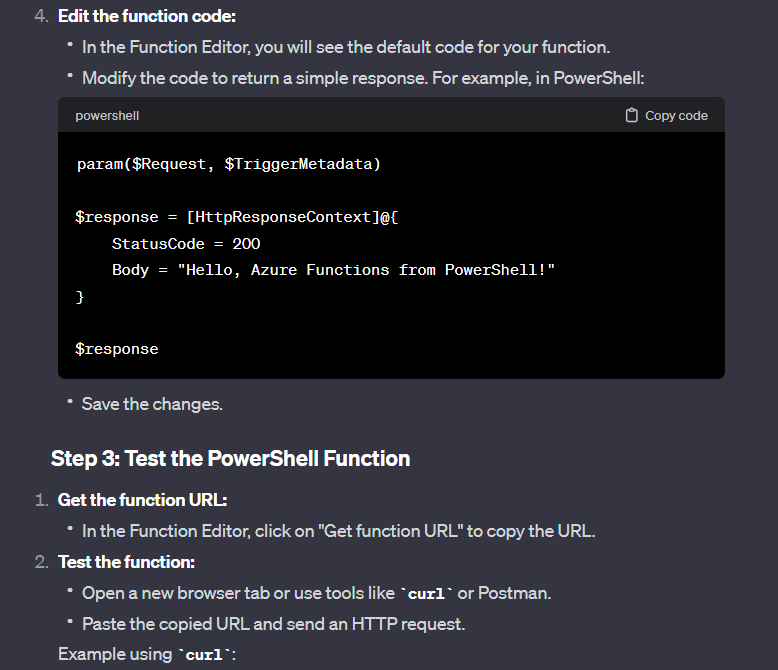
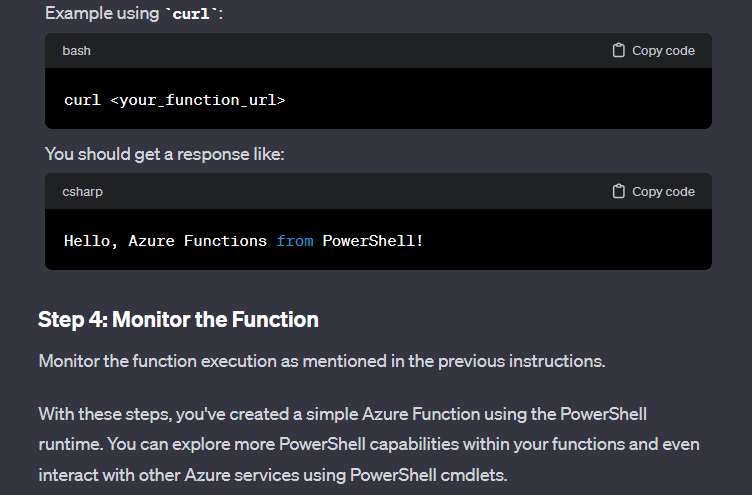
Following these instructions and supplementing it with reading Microsoft Docs on Azure Functions, I was able to create an HTTP trigger-based function:
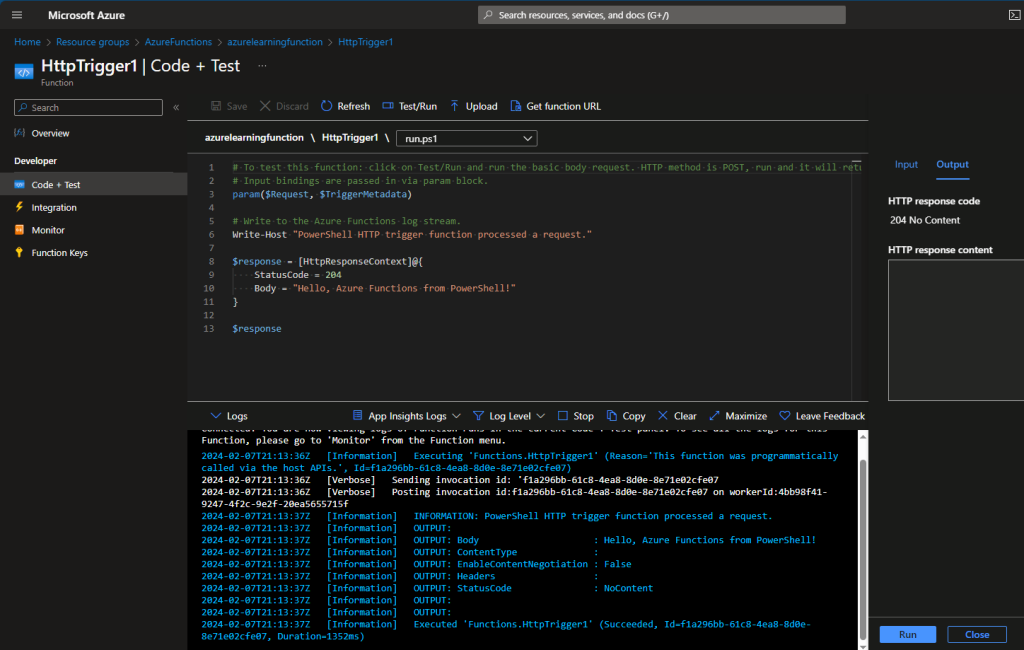
Awesome.
Finally on the Compute side of things, there is Azure App Service which allows you to run code on top of infrastructure you don’t have to manage. You can host and run services like Web Apps, RESTful API’s, WebJobs, and backend Mobile Applications in various languages like Python, .NET, .NET core, Java, Ruby, PHP, Node.Js, etc. Also supports Windows and Linux alike.
Azure Networking
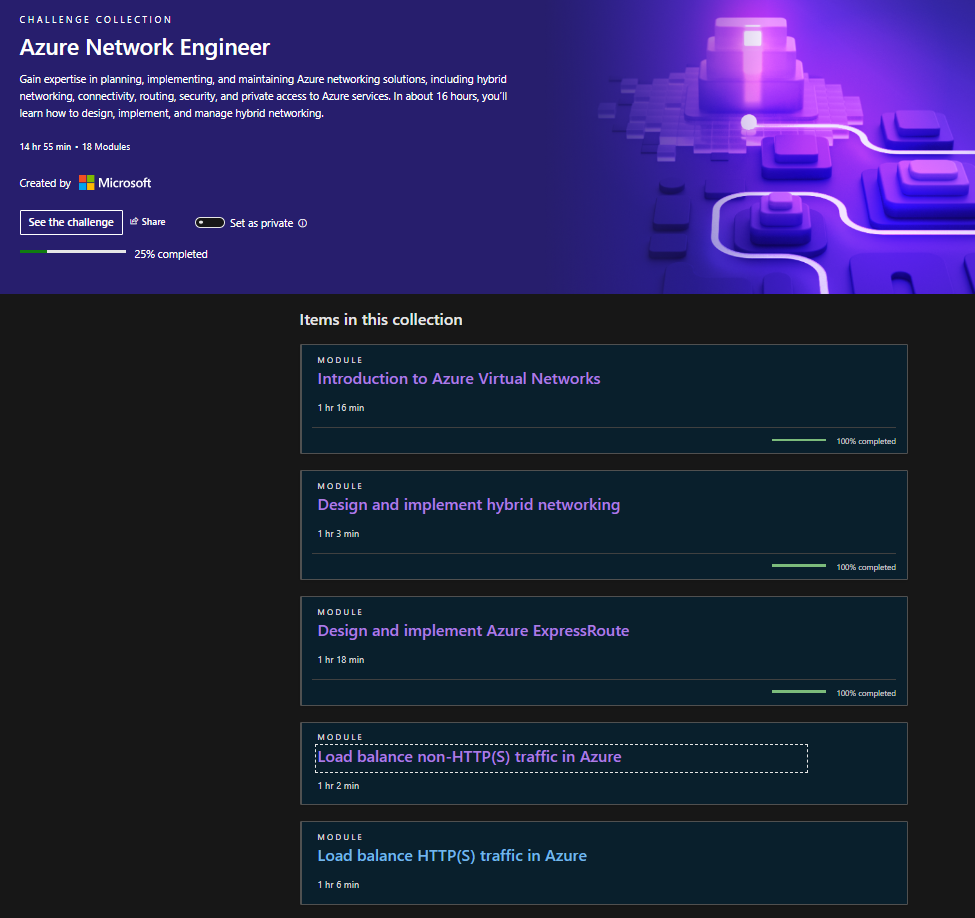
For this section, I decided to go the route of doing a Microsoft Challenge. Why? Well, I’ll be targeting Networking based knowledge and if I finish, I’ll get a voucher for certification. Why not? I chose to do this one:
Going through this should be enough for me to get a better understanding of networking in the cloud. At least from a theory standpoint. I plan on trying to do some of the exercises in my home lab. I should learn quite a bit from this though. For example, I understand that Azure VNETS take 5 IP spaces away from subnet, but what I didn’t know was that it takes the first IP in that space for the network address (duh), the second IP for the gateway, and the sequential 2 for Azure DNS mapping, then the last one for broadcasting. Also learned that for IPv6 it always uses a mask of /64. Yeah, I should learn quite a bit from this.
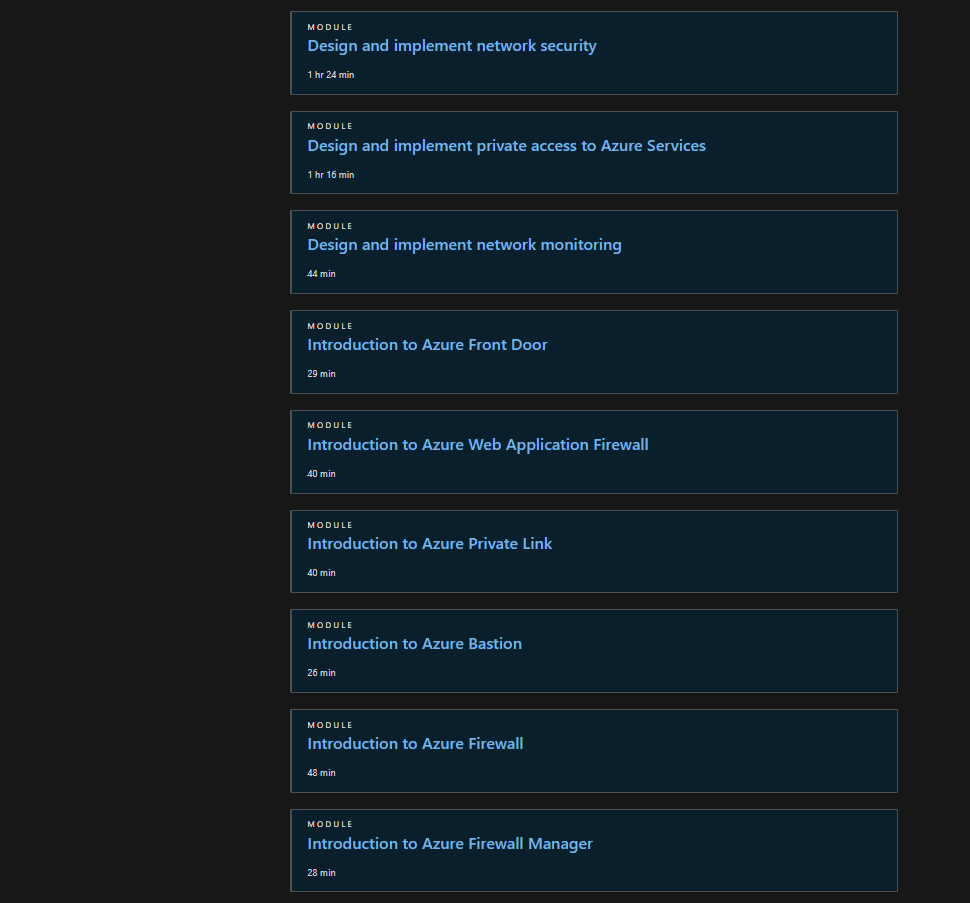
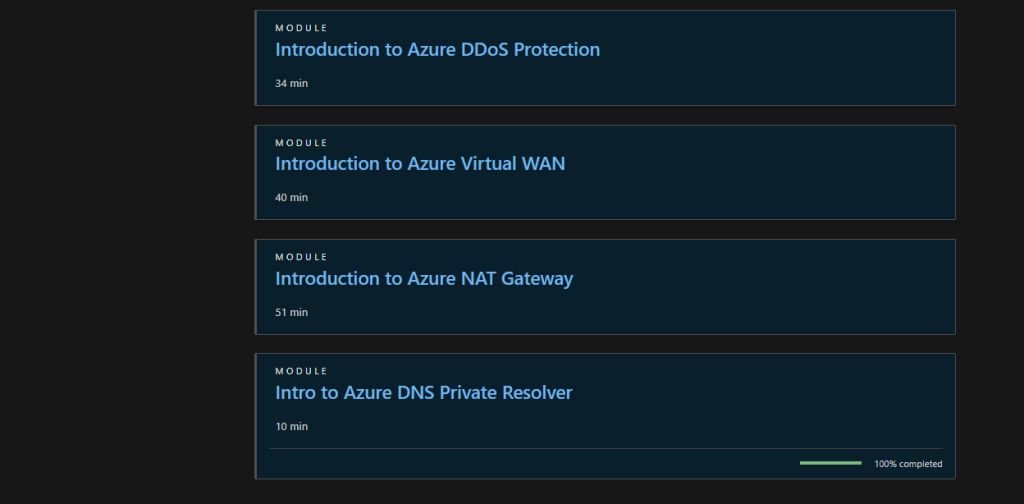
Update 2/12/24: I am now 25% done with the challenge collection and have learned a TON again. Here are just of the things I’ve picked up:
VNET Peering – data travels through Microsoft Infra Backbone and data are private in that sense since it does not go over the internet. There 2 kinds of peering: regional There is a VPN gateway in the backend when peering is enabled between 2 VNETs. Learned that when VNET peering is setup that in the backend you are configuring a VPN Gateway in the peered VNET. The other VNET then uses this remote gateway to access resources on the other VNET. You can then enable gateway transit which allows the peered VNET to not only access resources on the other VNET but also resources outsides of the peering such as resources on prem.
Azure VPN Gateway – Learned that is a specific type of network gateway that allows you to connect your on prem network to your Azure network via VPN connection. Reading the documentation, I learned something very interesting. When deploying a VPN Gateway resource, you also need to create a subnet with at least a /27 or larger range. This is for the backend VM that will be handling requests and all that jazz.
Learned how to deploy Azure local VNET gateways and how easy it is to deploy. This is great knowledge to have for when you need to connect 2 VNETs across global regions. Learned about site to site, point to site connections, Azure WAN, and even though I haven’t had the privilege to set these up yet, from a theory perspective, after learning the building blocks of these services, it makes sense.
ExpressRoute – learned about ExpressRoute circuits and how to create an instance via Azure portal. There are 4 types of ways to use ExpressRoute: co-located at a cloud exchange, point-to-point ethernet, any-to-any, and direct model.
Update: 2/13/24
Load Balancing Options for both HTTPS and non-HTTPS traffic in Azure:
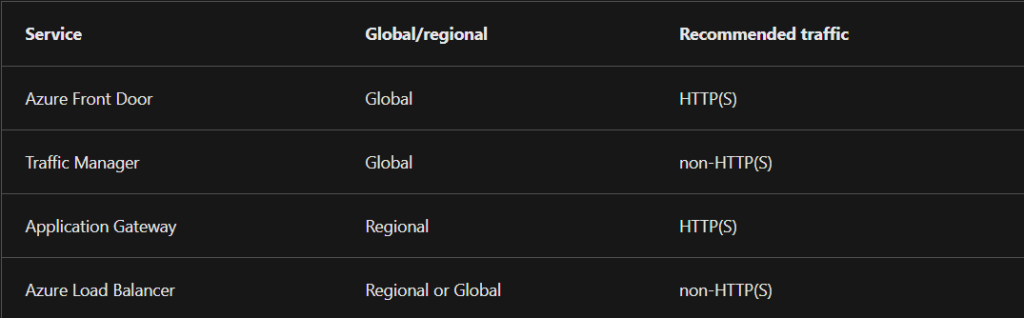
Ah Load Balancing. A topic I was always confused on and to be fair, if you don’t work with it often, who can blame you. Well, maybe it was just me. Either way, this challenge has been making so much sense to me and I finally understand the different load balancing options that Azure provides. Below I’ll share some details on the differences:
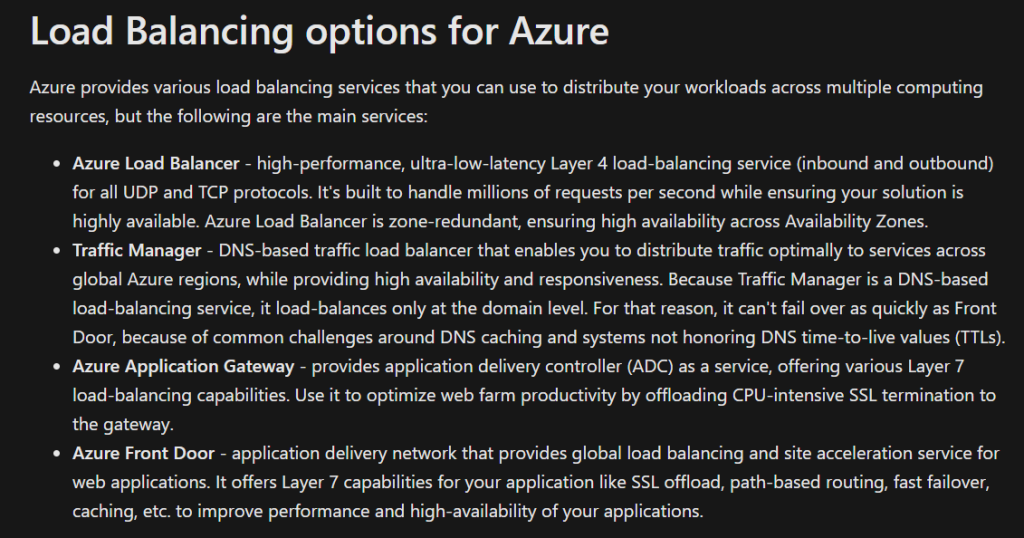
Azure Load Balancer (Global or Regional; Recommended for non-HTTPS traffic): can be global or regional, provides high availability load balancing across your VM’s. Can be used as an external load balancer at the front end to distribute traffic to your backend using an internal load balancer.

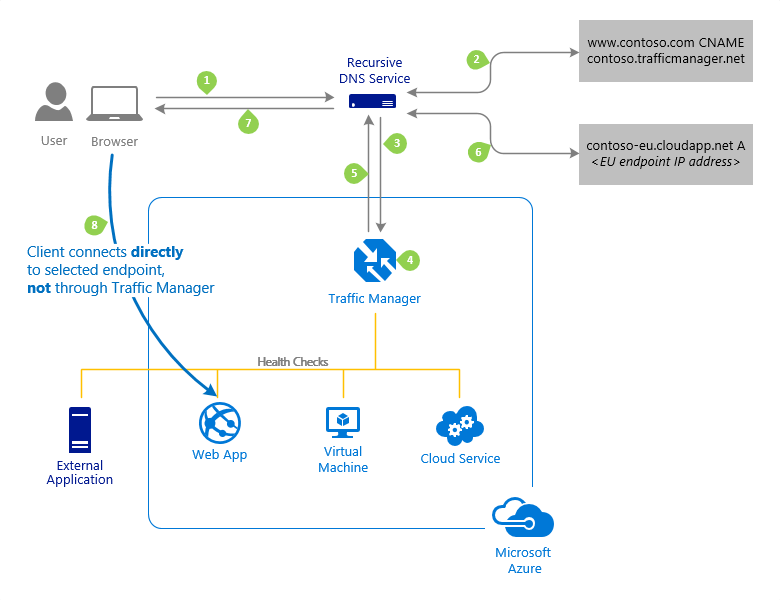
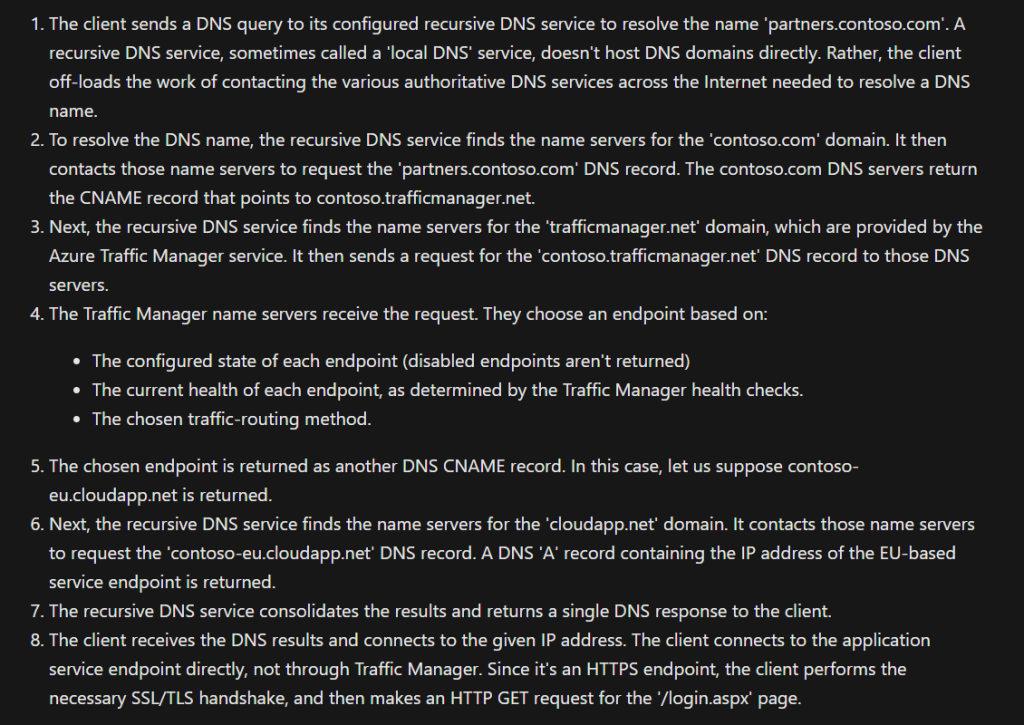
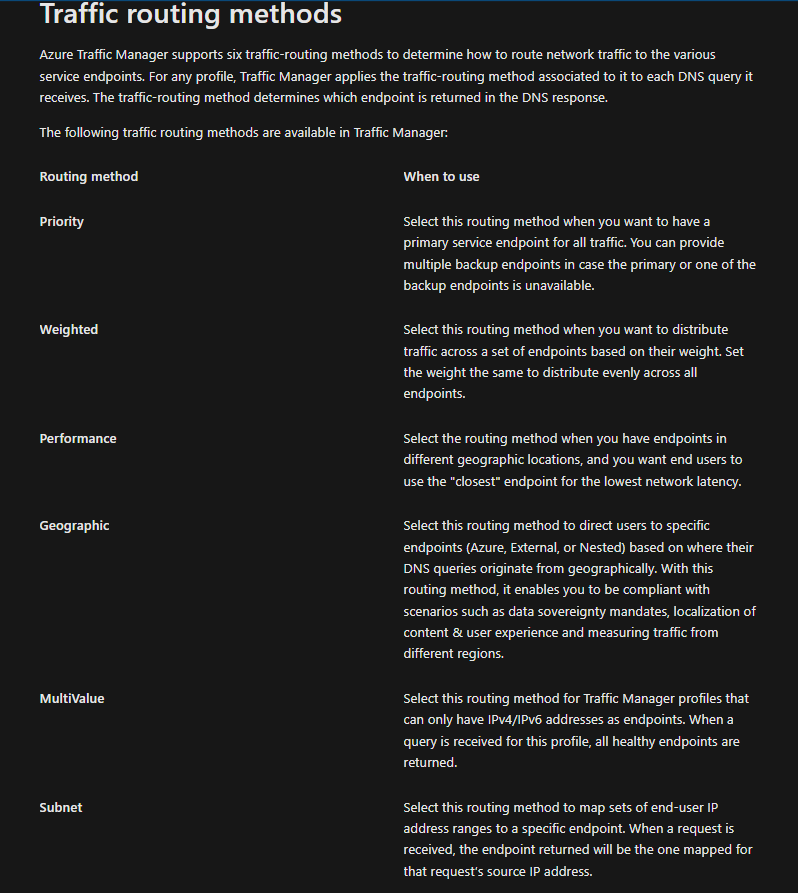
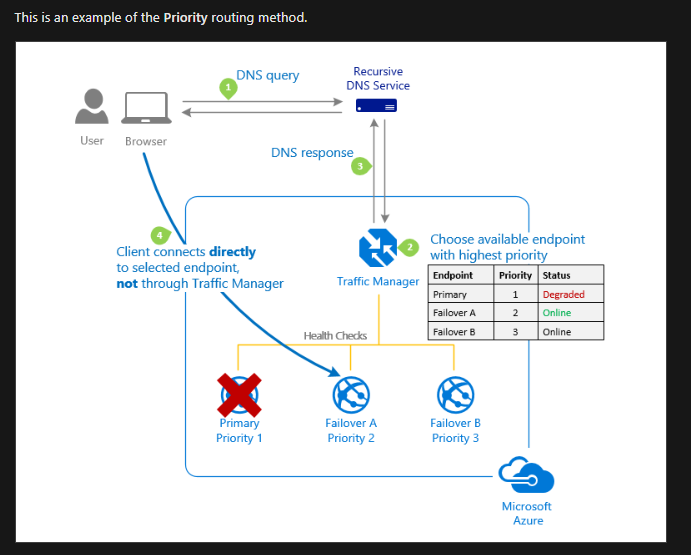
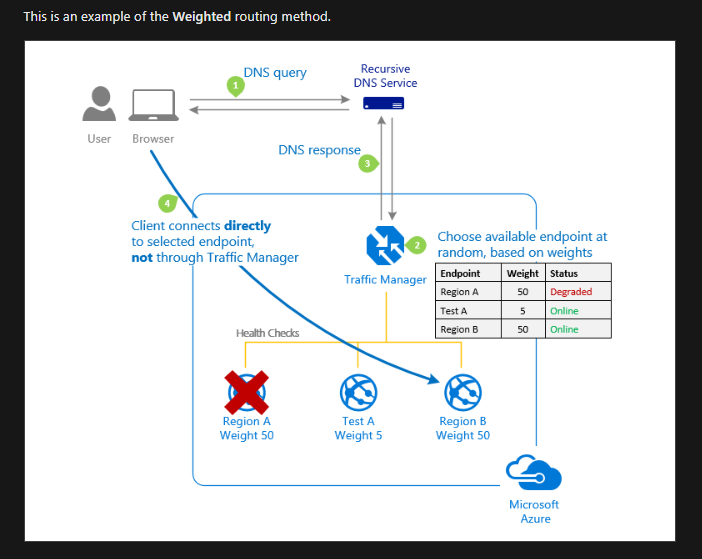
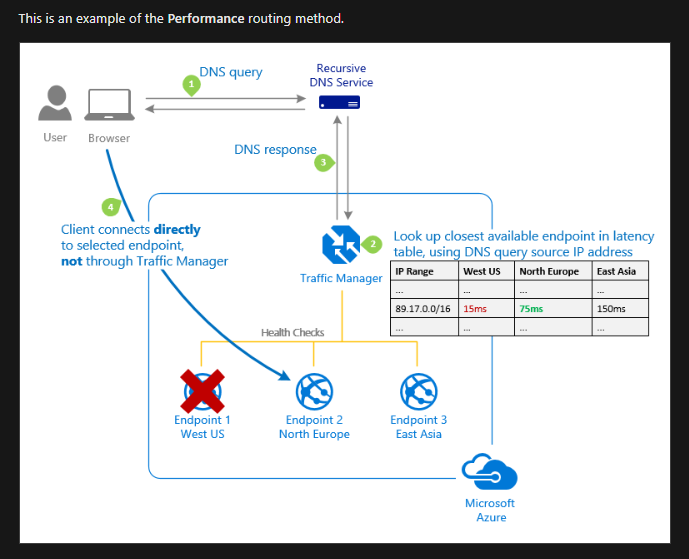
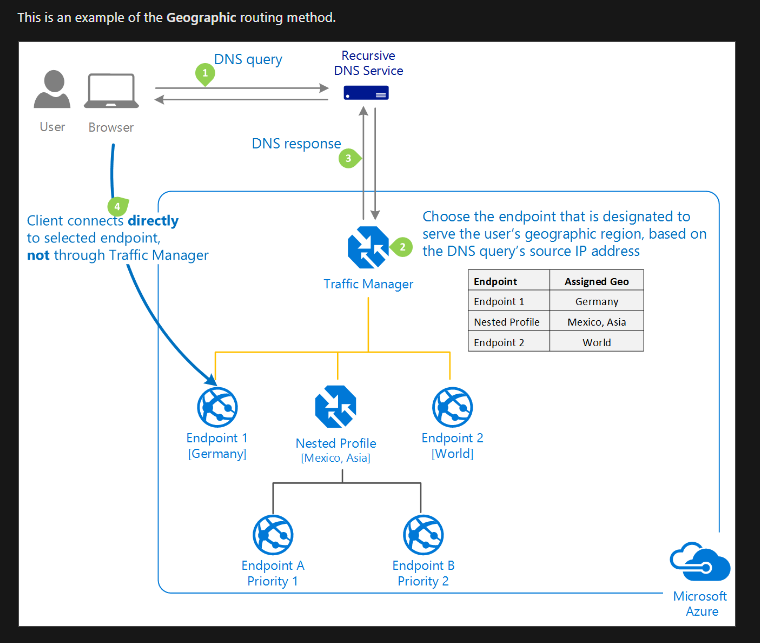
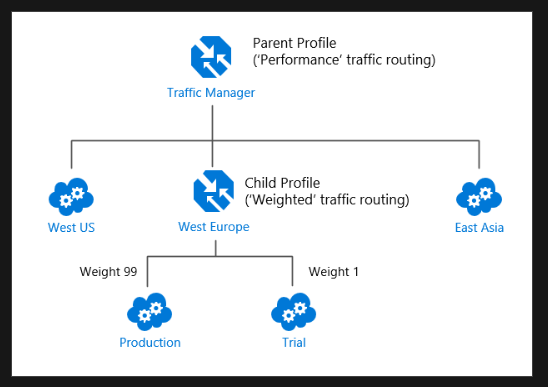
Azure Traffic Manager (Global; Recommended for non-HTTPS traffic): DNS based traffic load balancer with multiple types of routing! And I really like the way Microsoft shares details about that:
Load Balancing recommended for HTTPS traffic.
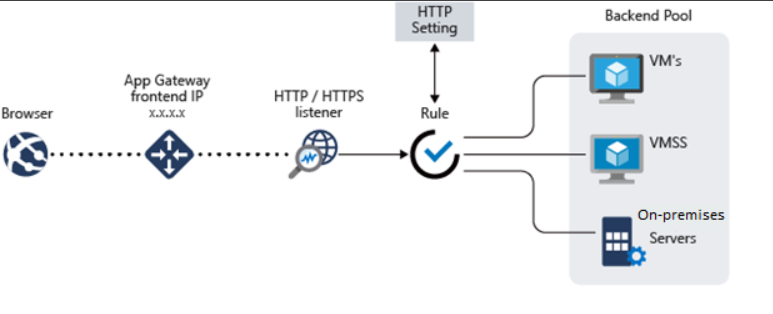
Azure Application Gateway (Regional; recommended for HTTP(S) traffic):
URL based routing used in an Application Gateway
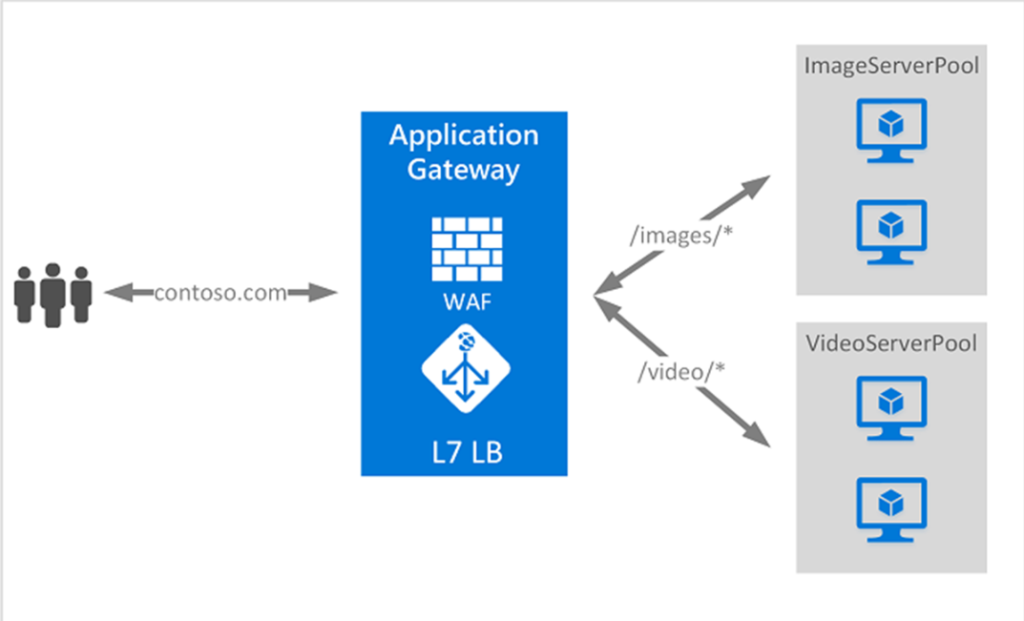
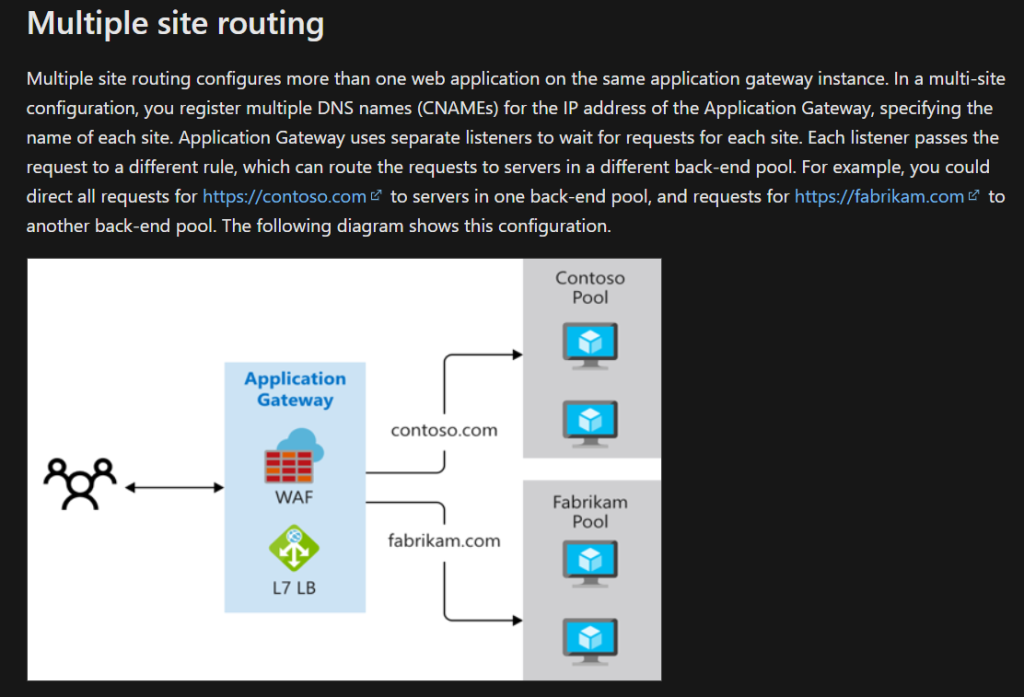
Multi-Site Routing used in an Application Gateway
Azure Front Door (Global; recommended for HTTP(S) traffic): there are 2 SKUs, Standard and Premium. Standard is used for content delivery optimization and Premium is that plus security focused. Both deal with SSL.
And that’s about it for Front Door. I don’t ever use it at work. I’ve only read the technical documentation and as you guessed it, it is a very exciting read. Forgot to add the /s. This will be one of the products that Azure provides that I’ll just dig deeper in when it is needed on the job.
Network Security and Privacy 2/20/24
In this next section, I finished the load balancing modules and to mix it up also did the Front Door module found way after the network security module. Then went back to go over the documentation and lab exercises based on network security and private links/endpoints and service endpoints.
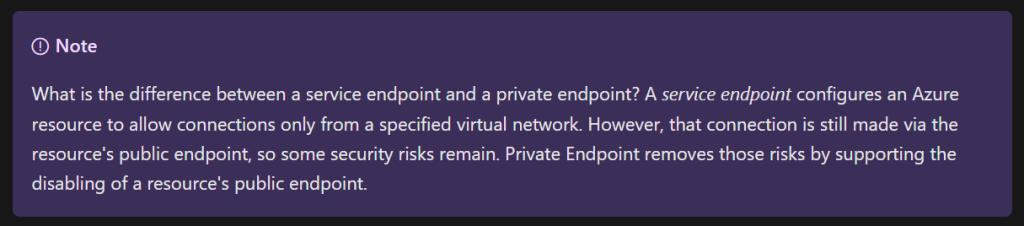
What are the differences between Service Endpoints, Private Links and Private Endpoints? See below how Microsoft defines this:
“Azure Private Link enables you to access Azure PaaS Services (for example, Azure Storage and SQL Database) and Azure hosted customer-owned/partner services over a Private Endpoint in your virtual network.
Private Endpoints grant network access to specific resources behind a given service providing granular segmentation. Traffic can reach the service resource from on premises without using public endpoints.
A service endpoint remains a publicly routable IP address. A private endpoint is a private IP in the address space of the virtual network where the private endpoint is configured.”
My definition:
Private endpoint is a logical private address that Azure creates using one of the subnets you specify. Private endpoints allows you to connect to Azure resources on Microsoft’s internal backbone instead of the public internet. It’s secure or ‘private’ in that sense. Private Links uses Private endpoints to establish a secure connection from Azure resource to Azure resource or from on prem to azure via VPN gateway or ExpressRoute connections.
Service endpoints are similar however they have a public routable IP. With service endpoints you can also add service tags which is a collection of Azure IPs for each service they have. Assign the tag and it allows communication between the current service and the IPs in that service tag. I like to think of it as a service-oriented whitelist you can assign to public address. Traffic still goes through Microsoft’s backbone but if you are more security focused and there is sensitive data you want to protect, then Private Links with Private Endpoints is what you’re looking for.
Here’s a great note from the docs comparing Service Endpoints to Private Endpoints/Private Links:
How Azure Private Link works – Training | Microsoft Learn
Azure Network Monitoring Tools 2/22/24
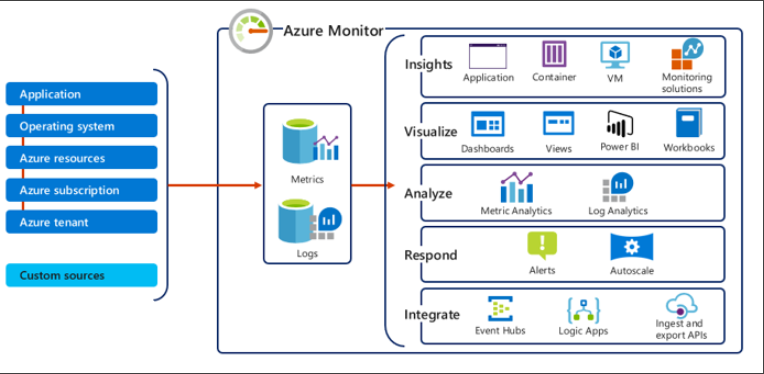
To monitor our Azure networking resources, we can use Azure Monitor. Azure Monitor collects data from various sources: applications, OS, Azure resources, Azure subscriptions, Azure tenant and custom sources. It categorizes the data collected into 2 types: Metrics and Logs.

Afterwards, you can do a lot with the data: Insights, visualizations, analysis, responding to certain thresholds, and integration.
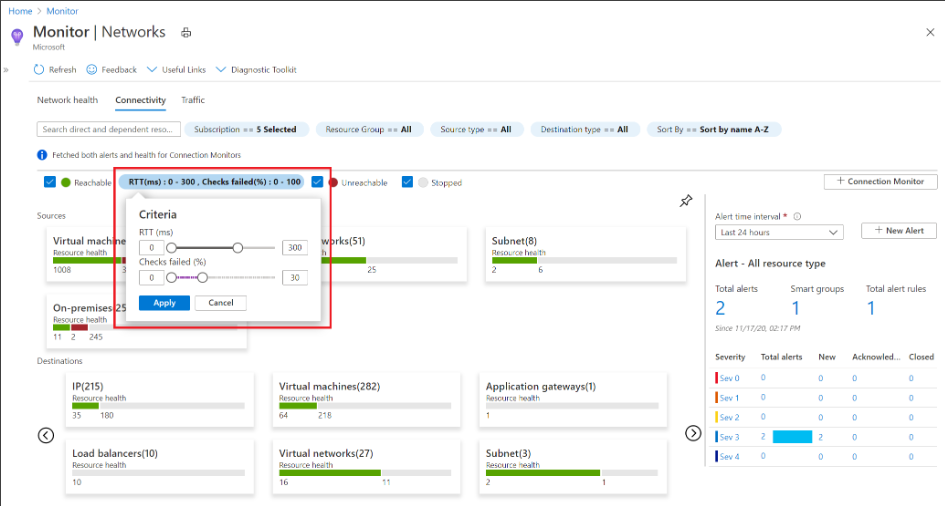
Azure Monitor provides a tool specifically for Networks called Azure Monitor Network Insights. Within this tool, actually exists a bundle of features we can use such as network health & metrics, connectivity, traffic, and diagnostic toolkit. We’ll take a look at each one for this section:
Network Health: this tab in Azure Monitor Network Insights offers a simple visualization of your network resources and their health. Included in this might be alerts you configured, metrics, and even a dependency view which helps me visualize how resource is configured (available for Azure Application Gateway, Azure vWAN, and Azure Load Balancer).
Connectivity: the connectivity tab shows you a visualization of the results of all tests configured via Connection Monitor for a selected set of subscriptions.
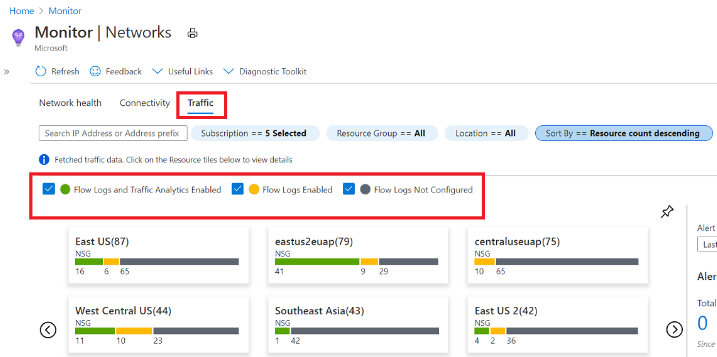
Traffic: this tab of Azure Monitor Network Insights provides access to all NSGs configured for NSG flow logs and Traffic Analytics for the selected set of subscriptions, grouped by location.
Diagnostic Toolkit: this one I find to be cool since it has multiple tools that you can take advantage of when troubleshooting your network.
- Network Watcher Packet Capture: enables you to create capture sessions to track traffic to and from a VM.
- Network Watcher VPN Troubleshooter: tool used to diagnose the health of a virtual network gateway or connection.
- Network Watcher Connection Troubleshooter: a tool to check a direct TCP connection from a VM to a VM, FQDN, URI, or IPv4 address.
- Network Watcher Next Hop: a diagnostic tool to obtain the next hop type and IP address of a packet from a specific VM and NIC. Knowing the next hop can help you establish if traffic is being directed to the expected destination, or whether the traffic is being sent nowhere.
- Network Watcher IP Flow Verify: a diagnostic tool to verify if a packet is allowed or denied to or from a VM based on 5 tuple information.
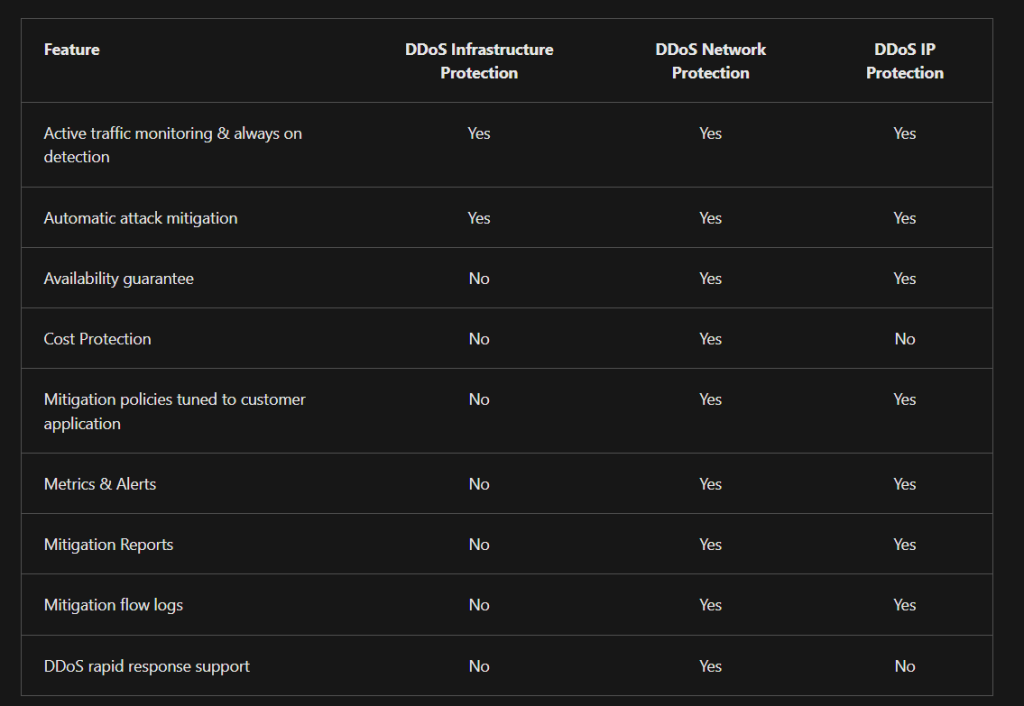
Now some DDoS stuff:
Well, that was a lot of info, and I am pretty sure there was more I missed. My next step forward is to review and study in the areas I feel are my weaknesses. Afterwards, take a practice test and review the results and study a bit more depending on these results.


No comments! Be the first commenter?